
The Five-Step Process for Data Exploration in a Jupyter Notebook
Video available
I also have a video from the Dunder Data YouTube channel where I demonstrate this entire process. I believe this is a post that is better viewed as a demonstration, so if you have the time see the video below.
Tutorial
A major pain point for beginners is writing too many lines of code in a single cell. When you are learning, you need to get feedback on every single line of code that you write and verify that it is in fact correct. Only once you have verified the result should you move on to the next line of code.
To help increase your ability to do data exploration in Jupyter Notebooks, I recommend the following five-step process:
- Write and execute a single line of code to explore your data
- Verify that this line of code works by inspecting the output
- Assign the result to a variable
- Within the same cell, in a second line output the head of the DataFrame or Series
- Continue to the next cell. Do not add more lines of code to the cell
Apply to every part of the analysis
You can apply this process to every part of your data analysis. Let’s see this process in action with a few examples. We will start by reading in the data.
import pandas as pd
Step 1: Write and execute a single line of code to explore your data
In this step, we make a call to the read_csv function.
pd.read_csv('../data/bikes.csv')
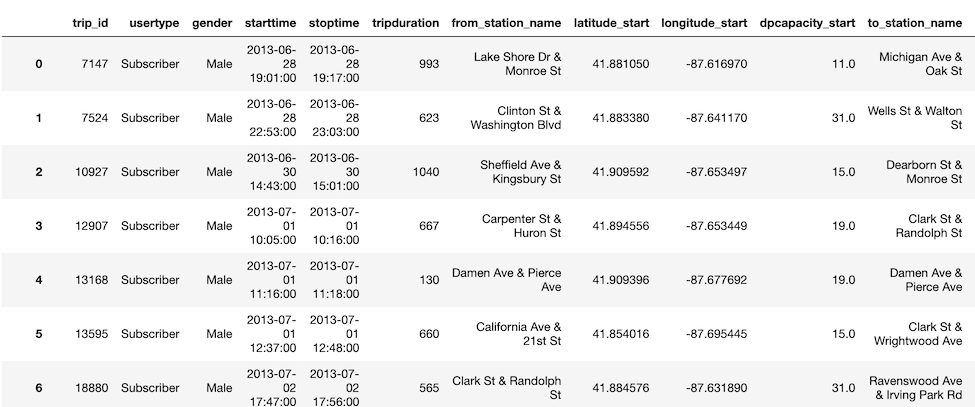
Step 2: Verify that this line of code works by inspecting the output
Looking above, the output appears to be correct. Of course, we can’t inspect every single value, but we can do a sanity check to see if a reasonable-looking DataFrame is produced.
Step 3: Assign the result to a variable
You would normally do this step in the same cell, but for this demonstration, we will place it in the cell below.
bikes = pd.read_csv('../data/bikes.csv')
If you are enjoying this article, consider purchasing the All Access Pass! which includes all my current and future material for one low price.
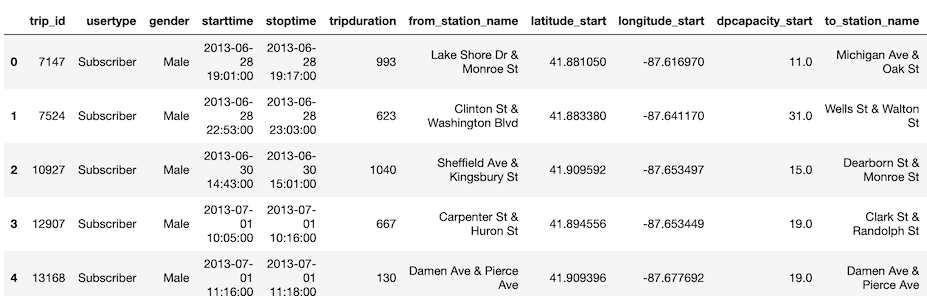
Step 4: Within the same cell, in a second line output the head of the DataFrame or Series
Again, all these steps would be combined in the same cell.
bikes.head()
Step 5: Continue to the next cell. Do not add more lines of code to the cell
It is tempting to do more analysis in a single cell. I advise against doing so when you are a beginner. By limiting your analysis to a single main line per cell, and outputting that result, you can easily trace your work from one step to the next. Most lines of code in a notebook will apply some operation to the data. It is vital that you can see exactly what this operation is doing. If you put multiple lines of code in a single cell, you lose track of what is happening and can’t easily determine the veracity of each operation.
More examples
Let’s see another simple example of the five-step process for data exploration in the notebook. Instead of writing each of the five steps in their own cell, the final result is shown with an explanation that follows.
bikes_id = bikes.set_index('trip_id')
bikes_id.head()
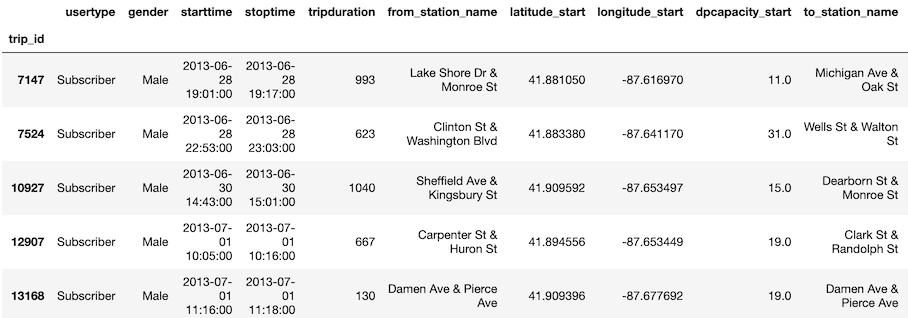
In this part of the analysis, we want to set one of the columns as the index. During step 1, we write a single line of code, bikes.set_index('trip_id'). In step 2, we manually verify that the output looks correct. In step 3, we assign the result to a variable with bikes_id = bikes.set_index('trip_id'). In step 4, we output the head as another line of code, and in step 5, we move on to the next cell.
No strict requirement for one line of code
The above examples each had a single main line of code followed by outputting the head of the DataFrame. Often times there will be a few more very simple lines of code that can be written in the same cell. You should not strictly adhere to writing a single line of code, but instead, think about keeping the amount of code written in a single cell to a minimum.
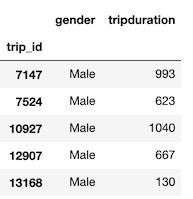
For instance, the following block has three lines of code. The first is very simple and creates a list of column names as strings. This is an instance where multiple lines of code are easily interpreted.
cols = ['gender', 'tripduration']
bikes_gt = bikes[cols]
bikes_gt.head()
When to assign the result to a variable
Not all operations on our data will need to be assigned to a variable. We might just be interested in seeing the results. But, for many operations, you will want to continue with the new transformed data. By assigning the result to a variable, you have immediate access to the previous result.
When to create a new variable name
In the second example, bikes_id was used as the new variable name for the result. Instead, we could have assigned the result to the same variable like this:
bikes = bikes.set_index('trip_id')
This would have the advantage of saving us some memory. Using two variable names keeps both DataFrames bikes and bikes_id in memory. The disadvantage of overwriting a variable name is that we lose traceability within our code. We no longer have access to the original bikes DataFrame. When you are first examining a dataset, I recommend creating new variable names for each new DataFrame/Series that you create. This way, you can access the state of your data at any time.
Continuously verifying results
Regardless of how adept you become at doing data explorations, it is good practice to verify each line of code. Data science is difficult and it is easy to make mistakes, even with trivial tasks. Data is also messy and it is good to be skeptical while proceeding through an analysis. Getting visual verification that each line of code is producing the desired result is important. Doing this also provides feedback to help you think about what avenues to explore next.
If you enjoyed this article, consider purchasing Master Data Analysis with Python, an extremely comprehensive course that will help you learn pandas to do data analysis.

Master Data Analysis with Python
Become an expert at using pandas to do data analysis with the comprehensive book Master Data Analysis with Python containing 500+ exercises and projects.
Recent Posts