
Anaconda is bloated — Set up a lean, robust data science environment with Miniconda and Conda-Forge

In this tutorial, I will describe a process for setting up a lean and robust Python data science environment on your system. By the end of the tutorial, your system will be set up such that:
- Python is installed with only the most common and useful packages for data science
- Conda is installed to manage packages and environments
- You’ll have a single, robust environment which minimizes dependency issues by relying on the conda-forge channel
Begin Mastering Data Science Now for Free!
Take my free Intro to Pandas course to begin your journey mastering data analysis with Python.
Common Data Science Setup
Currently, the standard advice for someone who desires to get their system set up to data science in Python is to download and install the Anaconda distribution provided by a company with the same name. Installing this distribution with the default settings should allow you to quickly get started doing data science work in Python.
Alternative Data Science Setup
While installing the Anaconda distribution is a valid way to get started, I believe there is a better approach. My main criticism with the Anaconda distribution is the amount of excess software and Python packages that are installed onto your system. The current download size sits at around 600MB and will take up over 2GB of disk space once installed.
Python packages installed
The Anaconda distribution installs the latest stable version of Python along with over 200 packages. You can see the package list for each installation. Most of these packages are unnecessary when first getting started.
Other software installed
The distribution comes with a few other pieces of software such as Anaconda Navigator, a graphical user interface for those less comfortable with the command line, and qtconsole, a terminal-like program with the ability to make graphs inline. Both of the programs aren’t necessary to do data science with Python. The distribution also install conda, an important and necessary tool to manage packages and environments.
The Miniconda distribution
The Miniconda distribution packages together just Python, conda, and a small number of other packages. Its download size is around 50MB or less than a tenth the size of Anaconda. It is possible to download just Python itself from python.org for an even smaller download, but the conda tool is very valuable and what we will use to set up a robust environment.
You might think you will be missing out on software available from Anaconda. There is no need to worry as you can always download it later using conda.
Conda
There are a number of ways to set up your system to do data science in Python. This tutorial relies upon a tool called conda which is both a package manager and an environment manager.
Package Manager
A package manager is a tool that installs, updates, and removes computer programs. For us, these computer programs will be third-party Python packages. A third-party Python package is any package that is not part of the Python standard library. There are many thousands of third-party packages available to be installed onto your system.
Another popular package manager is pip, which existed long before conda and is the default package manager for new Python installations. Although pip is a good tool, we will not use it, as conda contains more features and resolves dependencies better.
Environment Manager
An environment manager is a tool that creates an environment (sometimes referred to as a virtual environment), a completely separate and isolated area of your computer with its own installation of Python and own third-party packages that are independent from any other Python installation on your machine.
Getting Started — Downloading Miniconda
- DOWNLOAD MINICONDA HERE — Choose the installation for your operating system. Both Windows and macOS have graphical installers (.pkg file for macOS). macOS and Linux both have command line installers (.sh file). There will be instructions for both the graphical and command line installers, so you can choose either one.
Keeping Anaconda
If you already have Anaconda you can either uninstall it or keep it. Even if you are happy with the current status, you might consider uninstalling it as there is quite a lot of excess software and it does not take too much effort to get a minimal clean installation. Use the next section to uninstall Anaconda.
If you do not want to uninstall Anaconda, then do not install Miniconda. Instead, run the following from the command line:
conda update condaThis will update conda to the latest version which is necessary and important to ensure that your system is set up properly.
You will still need to create the environment, so skip to the section Creating a new environment just for data analysis now.
Uninstalling Anaconda
Navigate to the official Uninstalling Anaconda page. For macOS and Linux, use option B first and then complete the simple remove with option A.
Miniconda Installation
We will now continue with the Miniconda installation assuming you have downloaded the correct file for your operating system.
Windows
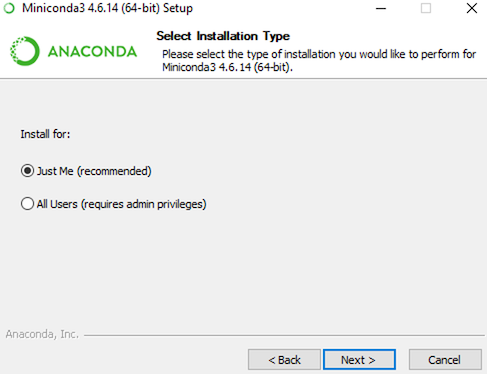
The name of the Windows file will begin with Miniconda3-latest-Windows. Begin the setup and after agreeing to the license you will be given the choice to install for ‘Just Me’ or ‘All Users’. It’s best to select ‘Just Me’ as this will give you full control of the installation without needing to have administrator rights to install new packages.
The next step will ask you for a file location for the installation. You should select the default location which will be C:\Users\<UserName>\Miniconda3where <UserName> is the name of your user folder.
Add to PATH?
The next screen asks you whether you’d like to add Anaconda (should say Miniconda) to the PATH and recommends that you do not do so. The main advantage of adding Miniconda to the path is to have access to it directly from the Command Prompt program. This is unnecessary as Miniconda provides a small program called Anaconda Prompt that does add the necessary file location to the PATH.
Keep the defaults as they are and complete the installation.
macOS
Graphical Installer
The graphical installer file will begin with Miniconda3-latest-MacOSX and end in .pkg. After agreeing to the license, you will be asked to choose to either ‘Install for me only’ or ‘Install on a specific disk’. Choose to ‘Install for me only’ and select the default location which is /Users/<UserName>/Miniconda3 where <UserName>is your specific user name. This will complete the installation.
Command Line Installer
The command line installer will end in .sh. Open up your terminal and navigate to the location of where you downloaded the installer and then run the following command. Make sure to use bash regardless of the shell you are using.
bash Miniconda3-latest-MacOSX-x86_64.shThis will start a stream of text that you’ll need to press enter to move through. You’ll be prompted to agree to the license and whether to accept the default location for the installation which will be /Users/<UserName>/Miniconda3. Press ENTER exactly once. The installation will appear to have paused and tempt you to press enter again. Do not do this. Instead, just wait patiently.
You will then be prompted to initialize Miniconda3. Enter ‘yes’ to complete the installation. Exit out of the shell.
Linux
If you are logging into a remote machine, you should be able to download the installer with the following command:
wget https://repo.anaconda.com/miniconda/Miniconda3-latest-Linux-x86_64.shTo begin the installation run the following command. Make sure to use bash regardless of the shell you are using.
bash Miniconda3-latest-Linux-x86_64.shThis will start a stream of text that you’ll need to press enter to move through. You’ll be prompted to agree to the license and whether to accept the default location for the installation which will be /home/<UserName>/miniconda3. Press ENTER exactly once. The installation will appear to have paused and tempt you to press enter again. Do not do this. Instead, just wait patiently.
You will then be prompted to initialize Miniconda3. Enter ‘yes’ to complete the installation. Exit out of the shell.
Finished Installing Python and Conda (All Operating Systems)
After completing the steps above, you will have finished installing both Python and conda along with a small number of other Python packages.
Test Installation
Let’s test that we have a successful installation.
Windows Users
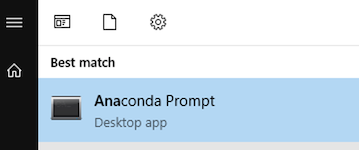
Windows users must always begin by starting the program Anaconda Prompt. This program is easily found by tapping the windows key and then typing in the exact name ‘Anaconda Prompt’.
macOS/Linux Users
Start your terminal program.
All users
Run the command conda list which will return the name, version, build number, and channel for each package currently installed.
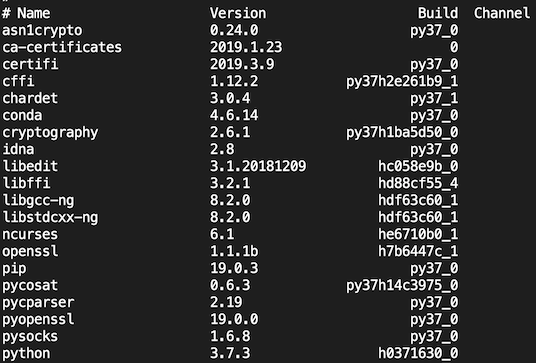
This is a list of all the packages that come installed with the default Miniconda distribution. Notice that python is considered a package.
This might appear to be a large number of packages, but it is a fraction of what is installed with the full Anaconda distribution.
The PATH
All operating systems have something called a PATH which is a list of directories that the operating system looks through in order to find executable programs. The directories in Windows paths are separated by a semi-colon, while macOS and Linux directories are separated by a colon. Let’s take a look at the path now.
- Windows users —
echo %PATH% - macOS/Linux —
echo $PATH
All operating systems should have the following two directories in their path that end with the following.
miniconda3/binminiconda3/condabin
It is the executable programs within these folders that are available for us to use on the command line. Listing out these programs on my macOS machine yields the following:
ls /Users/Ted/miniconda3/bin 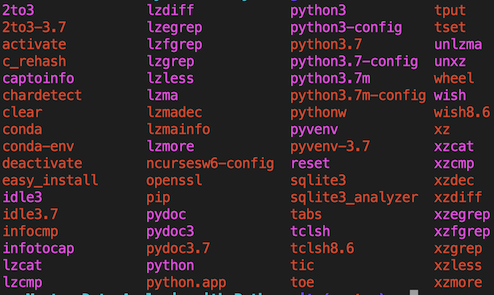
Verifying the Python Installation
By default, Miniconda creates an environment with the name ‘base’ that has all the packages displayed from conda list installed. Notice that '(base)' has been prepended to the prompt to indicate that this environment is active. When an environment is active, it means that your python code will be interpreted by the python executable in that environment. Let's verify this by starting a python interpreter by running the command python.

We can verify that it is running the executable by importing the sys library and fetching the executable attribute.

While it is possible to get started doing data analysis within the base environment, I recommend creating a completely separate environment.
A note on directory path
For the rest of this tutorial, I will use miniconda3/bin and miniconda3/condabin as shortcuts referring to the full path to these locations. If you followed the installation instructions from above, the full path will look similar for all operating systems. The full path for miniconda3/bin will be one of the following:
- Windows —
C:\Users\<UserName>\miniconda3\bin - macOS —
/Users/<UserName>/miniconda3/bin - Linux —
/home/<UserName>/miniconda3/bin
If you are enjoying this article, consider purchasing the All Access Pass! which includes all my current and future material for one low price.
Deactivating the base environment
By default, the base environment will always be active upon opening the terminal. Specifically, the miniconda3/bin directory will be added to your path and allow you to start python and all the other programs listed above. In my opinion, this isn't good practice and its better to explicitly activate the environment.
We can change conda’s configuration settings so that it does not automatically activate the base environment upon opening of the terminal.
On the command line run the following:
conda config --set auto_activate_base falseExit the shell, re-enter it, and output the path again. You should notice that only the miniconda3/condabin directory and not the other one. This command seems to have no effect on Windows Anaconda Prompt. Windows users will have to manually deactivate their base environment with conda deactivate.
Also, notice that ‘(base)’ is no longer prepended to the prompt.
Activating the base environment
You can reactivate the base environment with the following command:
conda activate baseThis will prepend the miniconda3/bin directory to your path and add '(base)' to the prompt. You can deactivate it again with the command:
conda deactivateCreating a new environment just for data analysis
While it’s possible to use the base environment to do all of our data science work, we will instead create a new environment where all of the packages are installed from the conda-forge channel. But, before we do that, it’s important to understand what a conda channel is.
Conda Channels
A conda channel is simply a repository of Python packages. There are dozens (if not hundreds) of channels available each with their own collection of Python packages. Whenever you install a new package using conda, its contents will come from exactly one channel. By default, conda will only install from the defaults channel. You can verify that the defaults channel is the only one available by running the following command:
conda config --show channels 
All channels have at least one URL available where the repository is located. You can find it with the following command:
conda info 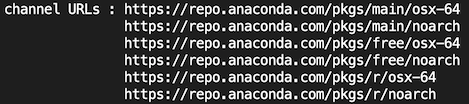
The above results are from my macOS. Linux and Windows channel URLS will look very similar. Notice that there are multiple URLs for this one channel. There’s even a URL for R packages, which seems bizarre, but conda is not a tool just for managing Python packages. It is a general purpose package manager that can work with any other programming language.
Navigate to one of the URLS and you will see a list of the packages available to download.
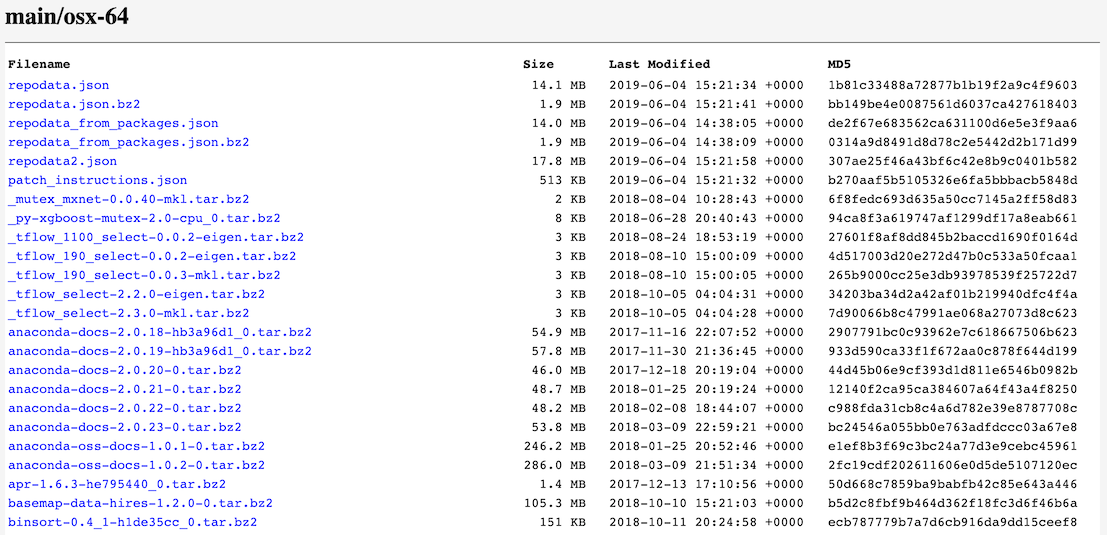
The default channel contains a hand-picked list from the team at Anaconda of popular and powerful packages to do scientific computing. However, there are many thousands of packages that exist that are not available in the defaults channel. This is where the conda-forge channel becomes important.
The conda-forge channel
Anaconda, the company, allows anyone to create a channel and will host these packages in the Anaconda Cloud. You can create an account right now and start your own channel with your specific collection of packages.
conda-forge is the most popular channel outside of the defaults and contains many more packages. My recommendation at the time of this writing is to install packages only from conda-forge (if possible) and not from the defaults. The reasons for this are described in the conda-forge documentation reprinted below:
- all packages are shared in a single channel named conda-forge
- care is taken that all packages are up-to-date
- common standards ensure that all packages have compatible versions
- by default, we build packages for macOS, linux amd64 and windows amd64
- many packages are updated by multiple maintainers with an easy option to become a maintainer
- an active core developer team is trying to also maintain abandoned packages
One of the main reasons to use a single channel such as conda-forge is the consistency it provides with package compatibility. For packages that have components written in a compiled language like C, compatibility improves when they are all compiled from the same base C library.
Creating our environment
It’s finally time that we create our new environment that we will use for data science. There are a few different ways to successfully accomplish this. One way will be shown now, with other alternative ways shown later on.
Create an empty environment
Let’s create an environment with the name ‘minimal_ds’ that has no packages in it, not even python itself.
conda create -n minimal_dsConfirm its creation by finding its location in your file system at miniconda3/envs/minimal_ds. Any downloads for the environment will be located here.
Activate the environment with:
conda activate minimal_dsBy default, this environment will install packages from the defaults channel.
Add the conda-forge channel
Let’s add the conda-forge channel as an option for just this environment. The --env option ensures that conda-forge is added only as to our currently active environment.
conda config --env --add channels conda-forgeConfirm that the channel has been added.
conda config --show channels 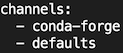
Running the first command from above will create a configuration file named .condarc in the environment's home directory (miniconda3/envs/minimal_ds). You can verify this by outputting its contents to the screen, which will be identical to the previous config command.
cat miniconda3/envs/minimal_ds/.condarcAdding a channel will not remove any previous channels. Instead, it will become the first channel that conda looks to find packages. Currently, if it cannot find a package in conda-forge, it will then look in defaults for it. But, if the same package exists in both, then it will choose to install it from the channel with the newest version. For instance, if conda-forge has pandas version 0.23 and the defaults has version 0.24 then conda will install pandas 0.24 from the defaults channel.
This behavior is unintuitive to me and it makes more sense to always use the channel that appears first in the channels list regardless of the version. Conda gives us a way to change this with the following command:
conda config --env --set channel_priority strictLet’s verify the configuration change.
conda config --show channel_priorityThe .condarc file has also been updated with the same information.
Changing this setting will cause conda to always install packages from conda-forge unless they don’t exist in it at all and then look to the defaults channel. There are some packages that only exist on the defaults channel.
Installing the packages
We are finally ready to install packages into our new environment. conda will only look in the conda-forge channel unless a package is missing and then turn to the defaults.
Personally, a minimal data science environment has numpy, scipy, pandas, scikit-learn, and matplotlib along with the newest stable version of python (which is 3.7 at the time of this writing). It will also have jupyter notebooks available. Let’s start this installation now.
conda install pandas scikit-learn matplotlib notebookNotice that python, numpy, and scipy weren’t explicitly included in the list of packages to install. These packages are dependencies of at least one of the included packages and will be installed along with many other dependencies. Let’s take a look at the packages to be installed before confirming.
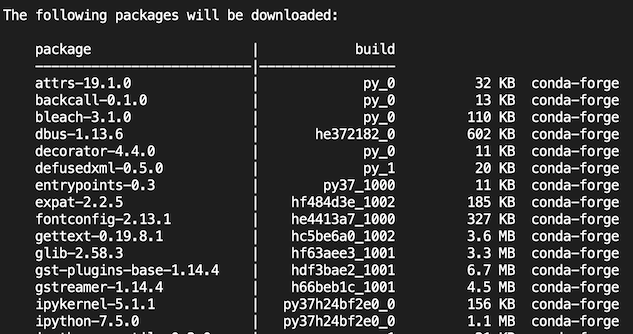
Conveniently, this list shows the name of the package, the version number, the size, and the channel. If the last column has a blank value, it indicates that it is being sourced from the defaults channel.
Note, that matplotlib does have qtconsole (a fairly large package) as a dependency for Windows and Linux systems.
Python Installation and Data Science Environment Setup Complete!
You should now have a robust environment set up to do data science using Python. It contains a minimal number of the most common and useful Python packages and will use conda-forge as its primary channel for package installation and updates.
When starting your terminal (or Anaconda Prompt) remember to activate the minimal_ds environment.
Summary of Steps
There were a lot of words that separated the steps in this tutorial. A summary of the commands is provided below.
- Install Miniconda for your OS with the default settings
- Prevent the base environment from automatically activating
conda config --set auto_activate_base false - Create an empty environment
conda create -n minimal_ds - Activate the environment
conda activate minimal_ds - Add conda-forge as the first channel
conda config --env --add channels conda-forge - Ensure that conda-forge is used if the package is available
conda config --env --set channel_priority strict - Install packages
conda install pandas scikit-learn matplotlib notebook
Other Considerations
There are a few other items that are worthy of discussion not mentioned above.
Only installing from conda-forge
Our current setup allows for packages not found on conda-forge to be searched for on defaults. It may improve compatibility issues to only use the conda-forge channel. To ensure that packages only come from conda-forge, you’ll have to specify the channel name (with the c option) together with the --override-channels option.
conda install -c conda-forge --override-channels <package_name>Conda always asks for confirmation of the installation after showing you the plan, which allows you to verify the channel before proceeding.
Installing packages not in conda-forge
As discussed, if a package does not exist in conda-forge, it will be searched for in the defaults channel. If it does not exist in the defaults channel, then the installation will fail with an error message. You can specify a different channel to use as long as you know its name. The easiest way to find the channel name of a package is to visit anaconda.org and search for it at the top of the page.
For instance, plotly_express is not available in either conda-forge or defaults. Searching for it on anaconda.org reveals its channel as plotly. Let’s install it by specifying the channel.
conda install -c plotly plotly_expressNote that the package plotly is a dependency and will also be installed from the plotly channel. If you search for the package plotly, you will see that it is available on conda-forge, but now it’s being installed from the plotly channel and not from conda-forge. Any channels provided to the c option will take precedence over the channels in the .condarc file.
Verify that Jupyter Notebooks execute in the correct environment
Although we have created our own environment with the ability to create Jupyter Notebooks, we are not guaranteed that they will execute Python in the same environment that they were launched. For instance, if we launch a Jupyter Notebook from the minimal_ds environment, it is possible that we are executing python from the base environment. This is quite surprising behavior as you would expect environments to be isolated from one another, but this isn’t quite the case.
We need to verify that executing notebooks launched from the minimal_ds environment execute python from the minimal_ds environment and not from anywhere else.
With the minimal_ds environment activated, run jupyter notebook and start a new 'Python 3' notebook. In the first cell of the notebook, execute the following two lines of code:
import sys
sys.executable
The result should return a path to the environment python (miniconda3/envs/minimal_ds/bin). If it returns the location for the base environment (miniconda3/bin) then you aren't executing python from the minimal_ds environment.
The cause of this is a ‘User’ kernel that is masking the environment kernel. Run the following command to see the list of kernels:
jupyter kernelspec listCheck to see if your python3 kernel is indeed a User kernel. Find the default locations for User kernels for your OS. The User kernel has the highest precedence over the Environment and System kernels. Yes, that’s right, even when you have an active environment, the User kernel takes precedence and allows you to execute python from other environments.
There really isn’t a need for a User kernel when you are working in active environment. I recommend removing the User kernel with the following command:
jupyter kernelspec remove python3Rerun the command jupyter kernelspec list and you will see the Environment kernel with the same name (python3). You should now launch another Jupyter Notebook and verify that the python executable is located in the active environment.
Alternative Environment Creation
In the above tutorial, we created an empty environment first and then installed the packages with a separate command. We did this so that we could add the conda-forge channel and set its priority. It is possible to do this in a single step, though this won’t permanently change the configuration file.
conda create -n minimal_ds -c conda-forge --strict-channel-priority pandas scikit-learn matplotlib notebookAnother method for creating an environment is with a text file usually given the name environment.yml. The contents of the file contain the name, channel(s) and packages. The contents of the file that would have created our environment look like this:
name: minimal_ds
channels:
  - conda-forge
dependencies:
- pandas
- scikit-learn
- matplotlib
- notebook
We could then run the command:
conda env create -f environment.ymlAn issue with this method is that there is no (current) way to set the channel_priority to strict.
Master Python, Data Science and Machine Learning
Immerse yourself in my comprehensive path for mastering data science and machine learning with Python. Purchase the All Access Pass to get lifetime access to all current and future courses. Some of the courses it contains:
- Master the Fundamentals of Python— A comprehensive introduction to Python (300+ pages, 150+ exercises)
- Master Data Analysis with Python — The most comprehensive course available to learn pandas. (800+ pages and 500+ exercises)
- Master Machine Learning with Python — A deep dive into doing machine learning with scikit-learn constantly updated to showcase the latest and greatest tools. (300+ pages)

Master Data Analysis with Python
Become an expert at using pandas to do data analysis with the comprehensive book Master Data Analysis with Python containing 500+ exercises and projects.
Recent Posts